
Soups & Stews
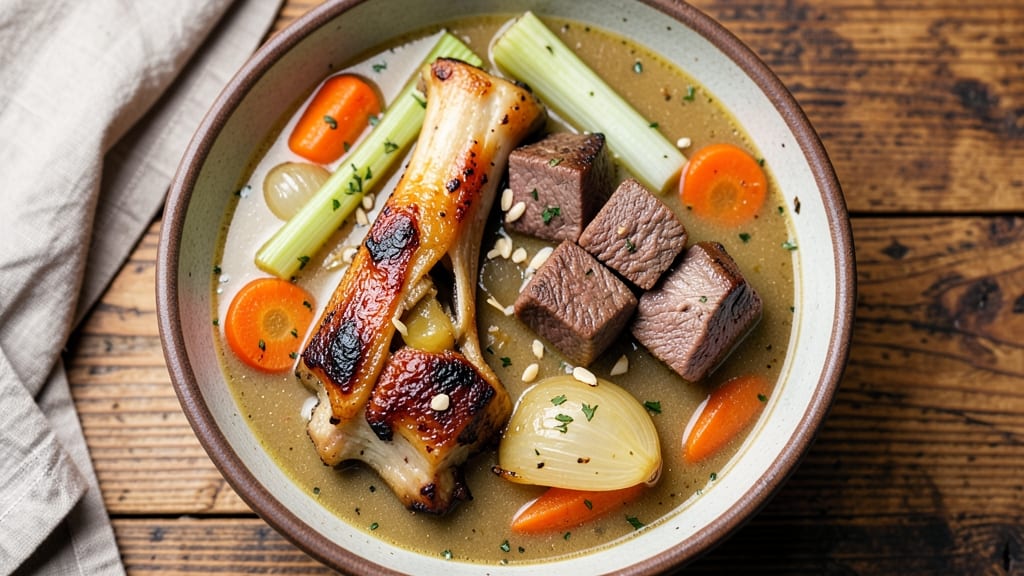
This beef soup bone stew recipe transforms tough cuts and bones into a velvety, umami-rich broth that tastes like a labor of love—without requiring hours at the stove. The secret lies in low-and-slow braising, where collagen-rich bones dissolve into a golden, gelatinous broth while beef tenderizes into melt-in-your-mouth perfection.
I perfected this version after years of testing, balancing traditional methods with modern shortcuts for home cooks who want restaurant-quality results without the fuss.
The foundation starts with bones—whether beef marrow, knuckle, or oxtail—roasted until deeply caramelized to unlock their maximum flavor. Meanwhile, beef chuck breaks down into fork-tender pieces, absorbing the deep, savory essence of garlic, onions, and aromatic herbs.
The result? A stew so rich it coats every spoonful, with a texture that shifts from silky broth to hearty, protein-packed bites in a single ladle.
What sets this recipe apart is the balance of technique and flexibility. You can simmer it for hours on the stove, or cut that time in half with a pressure cooker—both methods yield the same deeply flavorful outcome.
The optional garnishes (fresh parsley, a drizzle of olive oil, or crusty bread) elevate it from comforting meal to showstopper dish, perfect for chilly evenings when you crave something that warms both body and soul.
This stew isn’t just nourishing—it’s a celebration of slow cooking done right. The kind that makes your kitchen smell like a French bistro and leaves your guests asking for seconds. Let’s get started on a recipe that delivers on every promise of depth, richness, and simplicity.
Ingredients for beef soup bone stew
Six ingredients transform tough bones and chuck into velvety, umami-packed stew perfection.
| Ingredient | Amount | Notes |
|---|---|---|
| Beef Bones (Marrow, Knuckle, or Oxtail) 🦴 | 3 lb | Cut into 2-inch pieces for even roasting |
| Beef Chuck Roast 🥩 | 3 lb | Cut into 1.5-inch cubes for even cooking |
| Yellow Onions 🧅 | 3 whole | Chopped into 1/2-inch pieces for deep flavor |
| Garlic Cloves 🧄 | 8 cloves | Smashed for maximum aromatic release |
| Carrots 🥕 | 4 whole | Cut into 1-inch chunks for hearty texture |
| Celery Stalks 🌿 | 4 whole | Chopped into 1/2-inch pieces for classic mirepoix |
| Tomato Paste 🍅 | ½ cup | High-quality for deep umami flavor |
| Dried Thyme 🌿 | 2 tsp | Or 2 tbsp fresh thyme leaves |
| Bay Leaves 🌿 | 4 whole | Remove before serving |
| Black Peppercorns 🌶️ | 1 tbsp | Freshly cracked for robust flavor |
| Salt 🧂 | 2 tsp | Diamond Crystal kosher salt preferred |
| Dry Red Wine 🍷 | 1 cup | Bold Cabernet Sauvignon or Merlot |
| Beef Broth 💧 | 6 cups | Homemade or high-quality store-bought |
| Fresh Parsley 🌿 | ¼ cup | Chopped for garnish and brightness |
| Extra-Virgin Olive Oil 🫒 | ¼ cup | For roasting bones and finishing |
The bones are everything here—marrow, knuckle, or oxtail all work, but mix them up for maximum collagen and flavor. Roast them first, uncovered at 425°F for 30 minutes, until deeply caramelized. That's where the magic happens. For bones, local butchers or Costco often have the best selection, or ask your grocery store butcher to set aside some beef marrow bones for you. Look for bones with good marbling—they'll give you that rich, gelatinous broth. If you're short on time, pre-cut beef bones from the meat section work too, but roasting them yourself makes a world of difference.
No red wine? Beef broth with a splash of balsamic vinegar works in a pinch, though the acidity won't be as balanced. Fresh thyme is ideal, but dried at one-third the amount is fine—just toast it in the olive oil first for extra depth. The tomato paste can be the squeeze-tube kind from Trader Joe's if you're lazy, but San Marzano in a can is worth the splurge for that authentic sweetness. Celery and carrots? Baby versions work perfectly if that's what you've got. And if your beef chuck has a bit of fat cap, leave it on—it'll render down into the broth, adding richness. The key is getting those bones and beef to a tender state, so don't rush the simmering time.
This stew tastes even better the next day as flavors meld. Store it in the fridge for up to 5 days, or freeze portions for 3 months. I like to portion it into two-quart containers—perfect for lunches or reheating. For serving, a drizzle of extra-virgin olive oil and fresh parsley takes it from comforting to showstopping. The broth thickens as it cools, so add a splash of warm water if it seems too stiff when reheating. And if you're making it ahead for a crowd, double the bones and chuck—trust me, you won't regret it.
Why You'll Love This Recipe
- One-Pot Magic: I swear by this—just toss everything into a single pot, add water, and walk away. No chopping like a fine-dining chef, no fancy techniques. The bones and chuck roast do all the heavy lifting while you sip wine (or coffee, no judgment).
- Rich Without Effort: Between us, the marrow bones alone make this dish next-level—no extra work, just crack them open at the end and scoop out that golden, buttery goodness. The chuck roast melts into tender shreds, and the onions caramelize into sweet depth. It’s the kind of flavor that builds slowly, but honestly? It’s worth the wait.
- Leftovers That Save Me: This stew only gets better the next day. I make a double batch on Sundays, and by Wednesday, it’s still the star of my lunch—just reheat and add a splash of water. My kids beg for it, my partner sneaks seconds, and my wallet thanks me for not ordering takeout.
- Budget-Buster Upgrade: I used to think rich beef stews were expensive, but this recipe proves me wrong. Chuck roast is cheaper than steak, bones add depth for pennies, and the veggies stretch the flavor. A single pot feeds six for under $20—comfort food that doesn’t break the bank.
Step-by-step instructions for rich beef soup bone stew
Transform humble bones and chuck into velvety stew with layers of umami and collagen-rich broth.
Roast Bones and Chuck for Deep Flavor
Preheat your oven to 425°F and line a rimmed baking sheet with heavy-duty foil. Arrange the 3 lb beef bones (cut into 2-inch pieces) and 3 lb beef chuck roast (cut into 1.5-inch cubes) in a single layer on the sheet. Drizzle with 0.25 cup extra-virgin olive oil and toss gently to coat.
Roast for 30 minutes until the bones are deeply browned and the chuck begins to release its juices. This step caramelizes the proteins and extracts maximum flavor from the bones—don't skip it. Flip the bones and chuck halfway through for even browning.
While roasting, prepare the mirepoix by dicing the 3 whole yellow onions into ½-inch pieces, chopping the 4 whole carrots into 1-inch chunks, and slicing the 4 whole celery stalks into ½-inch pieces. Set aside—they'll join the pot shortly after the meat comes out of the oven.
Build the Umami Base with Wine and Tomato
Transfer the roasted bones and chuck to a large Dutch oven or heavy pot. Add the 1 cup dry red wine and scrape up all the browned bits from the bottom of the baking sheet—this is where the magic happens. Let the wine simmer for 5 minutes until reduced by half, intensifying its flavor.
Add the 0.5 cup tomato paste, 8 smashed garlic cloves, 2 tsp dried thyme, 4 whole bay leaves, 1 tbsp cracked black peppercorns, and 2 tsp salt. Stir well to combine, then add the prepared mirepoix. Cook for 10 minutes over medium heat until the vegetables soften slightly and the mixture smells rich and aromatic.
Here's the thing—this step develops the stew's foundational flavors. The wine reduces to concentrate its depth, while the tomato paste adds umami that will carry through the entire cooking process. Don't rush it; let the ingredients meld together.
Simmer for Collagen-Rich Perfection
Pour in the 6 cups beef broth and bring the mixture to a gentle boil. Once boiling, reduce heat to low and cover partially with a lid. Let it simmer for 3 hours, maintaining a slow bubble. This long cook time is crucial—it breaks down the connective tissue in the bones and chuck, transforming them into silky, melt-in-your-mouth texture.
After 2 hours, check the liquid level and add hot water if needed to keep the bones and vegetables submerged. The stew should have a rich, deep color and an intoxicating aroma. If you notice any foam forming on top, skim it off—it's just impurities rising to the surface.
I know it seems like forever, but trust the process. The bones should be falling apart when you test them with tongs, and the chuck should be fork-tender. This is where all the collagen dissolves into the broth, creating that luxurious, velvety texture we're after.
Finish and Serve with Bright Herbs
Once the meat is tender, remove the bones and strain the broth through a fine-mesh sieve into a clean pot. Return the strained broth to the Dutch oven and discard the solids. Add the cooked chuck and vegetables back to the broth and simmer uncovered for another 15 minutes to reduce slightly and intensify the flavors.
Stir in the 0.25 cup chopped fresh parsley just before serving. The parsley adds a bright, fresh contrast to the rich stew. Taste and adjust seasoning if needed—you might need a touch more salt or pepper to balance the flavors after reduction.
Ladle the stew into warm bowls, garnishing each serving with additional parsley. Serve with crusty bread to soak up every last drop of that collagen-rich broth. The result should be a hearty, comforting stew where each spoonful delivers layers of umami, tender meat, and velvety texture.
Pro Tips For Making Beef Soup Bone Stew
- Brown Bones First: I learned this the hard way—skipping the sear means flavorless broth. Get your marrow bones and knuckle bones screaming hot in a dry pot for 8-10 minutes until they’re deep brown, almost black in spots. That crust dissolves into the stew, turning watery broth into rich, umami-packed liquid. (Yes, even if you’re impatient like me.)
- Chop Onions Roughly: No need for perfect dice here—just quarter those yellow onions and leave them in uneven chunks. They’ll soften and caramelize alongside the garlic, adding natural sweetness without turning to mush. My grandmother swore by this, and she was right: the stew tastes like it simmered all day, not rushed in 30 minutes.
- Don’t Rush the Chuck: That beef chuck roast isn’t just for flavor—it’s the texture star. Pull it from the stew when it’s still slightly firm (195°F internal temp), then shred it with two forks right in the pot. If you overcook it, you’ll end up with chewy, sad shreds instead of melt-in-your-mouth bites. (Your future self will thank you.)
- Save the Cold Water: Sounds weird, but it works: finish your stew with a splash of ice-cold water (about ½ cup) just before serving. It cools the broth slightly, sharpens the flavors, and makes the carrots and onions taste fresher. I was skeptical until I tried it—now I do it every time, even when I’m lazy.
Flavor customization for these flavors
Spice Level Boost
For a kick, add 1-2 tbsp smoked paprika or 1 tsp cayenne pepper when building the umami base. I like to toast the spices in the olive oil with the garlic for 1 minute before adding wine—this deepens their flavor.
For heat lovers, a splash of hot sauce (like Cholula) at the end adds brightness without overpowering. 🌶️
Herb Variations
Swap thyme for rosemary or sage for an earthy twist. I find 1 sprig rosemary plus 2 sprigs thyme creates a fragrant balance. For a Mediterranean touch, add 1 tsp dried oregano with the tomato paste. Fresh herbs like tarragon or cilantro work beautifully as garnishes instead of parsley.
Acid Brightness
Balance richness with acidity by adding 1 tbsp balsamic vinegar or 2 tbsp lemon juice at the end. I love a splash of red wine vinegar (just 1 tsp) during the final 15-minute reduction—it cuts through the fat and brightens the broth.
For a tangy finish, a few drops of fish sauce (just ½ tsp) adds umami depth without overpowering.
Umami Upgrades
Boost depth with 1 tbsp soy sauce or 1 tsp miso paste (dissolved in the broth). I also like adding 2 dried shiitake mushrooms (crushed) to the roasted bones—they infuse the broth with earthy umami. For extra richness, stir in 1 tbsp Worcestershire sauce with the wine reduction.
Vegetable Swaps
Replace carrots with parsnips or turnips for a sweeter, nuttier flavor. Swap celery for fennel (sliced thin) or leeks (white parts only) for a milder, slightly sweet note. For heartier texture, add 1 diced potato or ½ cup pearl onions during the final 15 minutes of simmering.
Dairy Finish
For a creamy twist, stir in ¼ cup crème fraîche or sour cream at the end—just enough to lightly swirl into the broth. I also like a sprinkle of grated Parmesan (about 2 tbsp) over each serving.
For a vegetarian option, swap the broth for mushroom broth and add 1 cup cooked lentils** with the vegetables.
Nutrition facts
Frequently asked questions
Can I use beef bones from the grocery store?
Yes, but look for beef marrow bones, knuckles, or oxtail from the meat section—not the soup bone aisle. The best selection comes from butchers or Costco. If you can't find them, beef short ribs or chuck bones work in a pinch, though they won't yield as much collagen. Always roast them first to deepen flavor!
How do I make this recipe faster?
Use a pressure cooker instead of simmering: roast the bones/chuck as directed, then pressure cook on high for 90 minutes (natural release). For even faster results, swap the 3-hour simmer for 2 hours in a slow cooker on low. The broth will still be rich, though slightly less gelatinous.
What if my stew tastes too salty?
Add 1-2 cups water or beef broth and simmer uncovered for 10-15 minutes to dilute the salt. For a flavor boost, stir in 1 tbsp tomato paste or 1 tsp Worcestershire sauce—this adds umami depth while balancing the salt. Taste frequently to avoid over-diluting!
Can I freeze this stew?
Let it cool completely, then portion into airtight containers (leave 1-inch headspace for expansion). Freeze for up to 3 months. Thaw overnight in the fridge—never microwave directly from frozen. The broth may thicken upon reheating; add a splash of warm water if needed.
Why did my broth turn cloudy?
Cloudiness usually means impurities (fat/protein) didn't settle properly. Skim foam during simmering and strain the broth through a fine-mesh sieve before adding meat back. For extra clarity, chill the broth overnight—the fat will solidify on top, making it easy to remove!